Waking up to a hair dryer that only blasts cold air can quickly derail your morning routine. Instead of the warm, styling breeze you expect, you’re left with a chilly gust that does little more than gently ruffle your damp hair. This common issue is frustrating, but often, it doesn’t mean your trusty styling tool is destined for the trash. With a bit of troubleshooting and a few simple DIY fixes, you can often restore your hair dryer to its former warm glory. Let’s dive into why this happens and how you can get your hair dryer heating again.
Why Your Hair Dryer Only Blows Cold Air
When a hair dryer stops producing heat, it’s typically due to an internal component malfunction or a safety mechanism being triggered. Understanding the root cause is the first step toward a successful repair.
The Heating Element: A Common Culprit
At the heart of every hair dryer’s heating function is the heating element, a coiled wire that generates heat when electricity passes through it. Over time, these delicate coils can break or disconnect due to wear, physical shock, or excessive heat. A fractured heating element is a primary reason your hair dryer might only blow cold air.
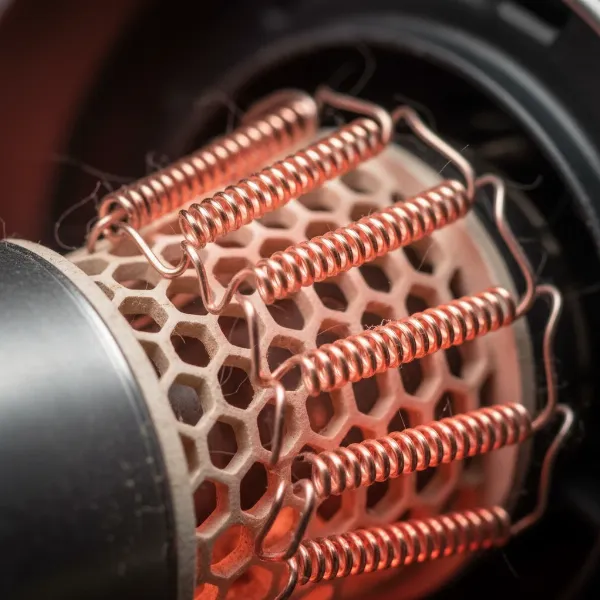 Close-up of a hair dryer's heating element, showing delicate coiled wire for heat generation.
Overheating and the Thermal Fuse
Modern hair dryers are equipped with safety features designed to prevent overheating and potential fire hazards. The thermal fuse is a crucial component that trips and cuts power to the heating element if the dryer gets too hot. While a fuse can sometimes fail on its own, it commonly blows as a protective response to restricted airflow or other issues causing the dryer to overheat.
Clogged Air Vents and Filters
One of the most frequent — and often overlooked — reasons for a hair dryer to blow cold air is a clogged air intake or exhaust vent. Lint, dust, and hair can accumulate in these areas, restricting airflow. When air cannot circulate properly, the heating element can overheat, leading the thermal fuse to trip and shut off the heat. This is a simple problem with a straightforward solution.
Malfunctioning Thermostat or Switches
Beyond the heating element and thermal fuse, other electrical components can also fail. A malfunctioning thermostat might incorrectly sense the temperature, preventing the heating element from engaging. Similarly, faulty on/off, speed, or heat switches can disrupt the electrical flow to the heating component, leading to a cold air output. In some specific models, dirt or debris inside the thermostat can even act as a safety function, shutting off hot air.
Hidden Damage: Wiring and Cold Shot Button
Sometimes the issue is less obvious. Internal wiring can become loose, frayed, or damaged, preventing electricity from reaching the heating element. Additionally, a simple oversight like the “cold shot” button being inadvertently engaged or stuck can be the culprit, as this feature is designed specifically to produce cool air. It’s a quick check that can save you a lot of time.
Safety First: Essential Steps Before Any Repair
Before you embark on any troubleshooting or repair, prioritizing safety is paramount. Working with electrical appliances carries inherent risks, so always take these precautions.
Unplug and Cool Down
The absolute first step is to unplug your hair dryer from the power outlet. Never attempt to inspect or repair an electrical appliance while it is still plugged in. Allow the dryer to cool down completely, especially if you suspect it was overheating, before you begin any work. This prevents electrical shock and burn injuries.
Gather Your Tools
Having the right tools on hand will make the repair process much smoother. You’ll typically need:
- Small screwdrivers (Phillips and flathead, often precision sizes)
- A soft brush or cotton swabs for cleaning
- Compressed air (optional, for stubborn dust)
- A multimeter (for advanced electrical testing)
- Pliers (for manipulating small wires)
Step-by-Step Troubleshooting and DIY Fixes
Once you’ve ensured safety and gathered your tools, you can systematically diagnose and potentially fix your hair dryer.
Check Basic Settings and Controls
Start with the simplest checks. Ensure your hair dryer is set to a heat setting and not accidentally on a “cool” or “cold shot” mode. Sometimes, the cold shot button can get stuck in the “on” position. Toggle all switches to ensure they move freely and are correctly positioned for heat. If your hair dryer has an adjustable temperature dial, try turning it to various heat levels.
Clean Air Vents and Filters Thoroughly
A clogged air filter is a very common cause of cold air. Locate the air intake vent, usually at the back of the hair dryer. Remove any accumulated lint, dust, and hair using a small brush, cotton swab, or even tweezers. For a deeper clean, you can use compressed air to dislodge internal dust buildup. Ensure both the intake and exhaust vents are clear for optimal airflow. Regular cleaning of these filters can significantly prolong your hair dryer’s life and prevent future heating issues.
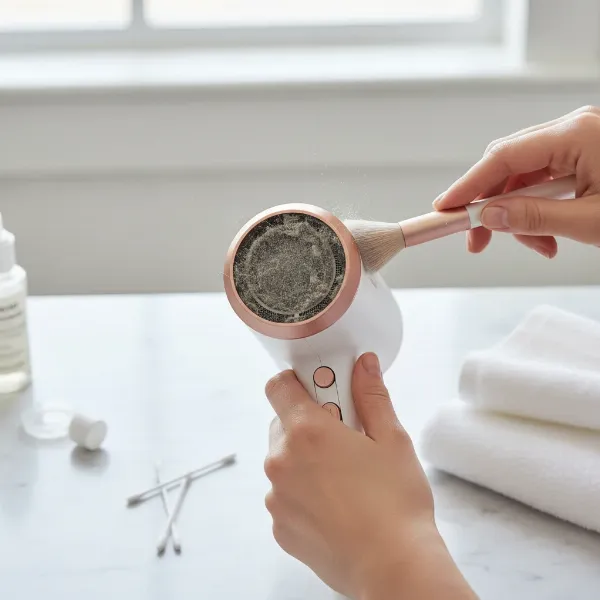 Person cleaning lint and dust from a hair dryer's rear air intake filter with a small brush.
Reset the Thermal Protection System
Many hair dryers have a built-in thermal protection system that automatically cuts off heat when the unit overheats. After cleaning the vents, unplug the hair dryer and allow it to cool for about 15-20 minutes. This cooling period allows the internal thermal fuse or reset switch to reset itself. Some hair dryers or even bathroom GFCI outlets have a manual reset button that you might need to press.
Inspect the Power Cord and Internal Wiring
Visually inspect the power cord for any signs of damage, such as fraying, cuts, or exposed wires. A damaged cord can prevent power from reaching the heating element. If the cord appears fine, you may need to open the hair dryer’s casing to inspect the internal wiring. Carefully unscrew the housing (screws are often recessed near the motor vent). Look for any loose or burnt wires, especially those connected to the heating element or switches. If you find minor damage, electrical tape or heat-shrink tubing might be a temporary fix, but significant damage often requires a replacement part or professional repair.
Test the Heating Element for Continuity
For a more advanced diagnosis, a multimeter can be used to test the heating element. After opening the housing and accessing the heating element, visually inspect the coils for any obvious breaks or debris. Set your multimeter to the continuity setting. Place the probes on the two wires leading to the heating element. A working element should show continuity (a closed circuit or a specific resistance reading). If there’s no continuity, the heating element is likely broken and will need to be replaced.
Examine the Thermostat and Switches
With the housing open, locate the thermostat, often situated near the heating element. Inspect it for any visible signs of damage, discoloration, or debris that might be interfering with its function. Some thermostats can be “tapped” firmly (on a hard surface with a towel for protection) to dislodge internal debris that might be causing them to shut off the hot air. Similarly, test the on/off, speed, and heat switches for continuity using your multimeter. If a switch doesn’t show continuity when in the “on” position, it’s faulty and needs replacement.
When to Repair, When to Replace: Making an Informed Decision
Deciding whether to repair or replace your hair dryer depends on several factors, including the cost of parts, the complexity of the repair, and the age of the appliance.
Cost-Benefit Analysis
While simple fixes like cleaning can save you money, more complex repairs involving component replacement can add up. Professional repairs typically cost between $50 and $150 for parts, plus labor. A good rule of thumb is the “50% rule”: if the cost of repair exceeds 50% of the price of a new, comparable hair dryer, it might be more economical to replace it. Consider the overall value of your hair dryer; high-end models might be worth the investment in repair, whereas inexpensive consumer models are often replaced.
Age and Durability Considerations
Hair dryers, like all electronics, have a lifespan. Most components can fail after 3-5 years of regular use due to normal wear and tear, dust buildup, or overheating. If your hair dryer is older and frequently used, multiple components might be nearing the end of their life, making replacement a more practical long-term solution. Investing in a new hair dryer with advanced safety features and durable components can be a wise choice if your current one is constantly giving you trouble.
Extend Your Hair Dryer’s Life: Maintenance Tips
Preventing future issues is often easier than fixing them. A few simple maintenance practices can significantly extend the life of your hair dryer and keep it blowing warm air consistently.
Regular Cleaning Routines
Make it a habit to clean the air intake filter regularly, ideally after every few uses, or at least once a month if you use it daily. This prevents lint and hair buildup, which is a major cause of overheating and thermal fuse activation. A quick wipe-down with a cloth and occasionally using a soft brush can keep the airflow unobstructed.
Proper Storage and Handling
Always store your hair dryer carefully. Avoid wrapping the cord tightly around the body, as this can cause internal wire damage over time. Instead, loosely coil the cord. Protect it from accidental drops or impacts that could damage the heating element or other delicate internal components. Treat your hair dryer gently, and it will serve you faithfully for years.
Conclusion
A hair dryer blowing only cold air can be a frustrating problem, but it’s often a fixable one. By systematically checking for common issues like clogged vents, a tripped thermal fuse, or a faulty heating element, you can diagnose the problem and potentially restore its functionality. Remember to prioritize safety by always unplugging the device before inspection. While some fixes are straightforward, more complex issues might warrant a replacement, especially if your hair dryer is older or the repair costs are high. Regular cleaning and proper handling are your best defense against future heating problems, ensuring you always have a warm, styling breeze at your fingertips.
What steps will you take today to ensure your hair dryer is ready for consistent warm air?
Frequently Asked Questions
Why does my hair dryer suddenly only blow cold air?
The most common reasons for a hair dryer to suddenly blow cold air include a tripped thermal fuse (often due to overheating from clogged vents), a broken heating element, or a malfunctioning thermostat. Less commonly, a stuck “cold shot” button or damaged internal wiring can also be the cause.
Can I fix a hair dryer heating element myself?
Yes, it is possible to fix a hair dryer heating element yourself if you are comfortable with basic electrical repairs and using tools like a multimeter. You’ll need to open the dryer’s housing, test the element for continuity, and replace it if it’s broken. Always prioritize safety by unplugging the dryer first.
How often should I clean my hair dryer’s filter?
It is recommended to clean your hair dryer’s air intake filter regularly, ideally after every few uses or at least once a month, especially if you use it daily. This prevents lint and hair buildup, which can restrict airflow, cause overheating, and lead to the dryer blowing only cold air.
What tools do I need to repair a hair dryer?
For most hair dryer repairs, you will need small screwdrivers (Phillips and flathead), a soft brush or cotton swabs for cleaning, and potentially compressed air. For electrical diagnostics like testing the heating element or thermal fuse, a multimeter is essential. Pliers might also be useful for handling wires.
Is it normal for a hair dryer to blow cold air sometimes?
Yes, many hair dryers have a “cold shot” button or a cool air setting designed to provide a blast of cold air, which helps to set hairstyles and reduce frizz. If your hair dryer consistently blows cold air regardless of the settings, then there’s likely a malfunction rather than a normal function.
What is a thermal fuse in a hair dryer?
A thermal fuse in a Hair Dryer is a safety device that automatically cuts off power to the heating element if the dryer’s internal temperature becomes too high. This prevents overheating and potential fire hazards. If the thermal fuse blows, it needs to be replaced to restore heating function.