Safeguarding Your Strands: A Guide to Hair Dryer Cord Safety
Your hair dryer is a daily essential for many, but its convenience can quickly turn into a hazard if its power cord isn’t properly maintained. A damaged hair dryer cord isn’t just an inconvenience; it poses serious risks to your safety and your home. This comprehensive guide will walk you through understanding these dangers, deciding when to repair or replace, performing minor fixes, and adopting preventative measures to ensure your hair styling routine remains safe and worry-free.
Understanding the Dangers of a Frayed Hair Dryer Cord
The power cord is the lifeline of your hair dryer, supplying the electricity it needs to function. When this cord becomes damaged, it compromises the insulation designed to protect you from the electrical current. The risks associated with a frayed hair dryer cord are significant, primarily electric shock and fire. Exposed wires can lead to direct contact with live electricity, resulting in a dangerous shock, while a short circuit caused by damaged insulation can generate intense heat, sparking a fire.
Identifying different types of damage is crucial for early intervention. Look out for visible fraying, where the outer jacket of the cord is worn away, exposing the inner wires. Exposed wires are an obvious red flag, indicating the protective layers are completely compromised. Loose connections, often found at the plug or where the cord enters the hair dryer body, can cause intermittent power and generate heat. Finally, short circuits, though sometimes invisible, might manifest as the hair dryer suddenly shutting off, tripping a breaker, or producing a burning smell. Any of these signs warrant immediate attention.
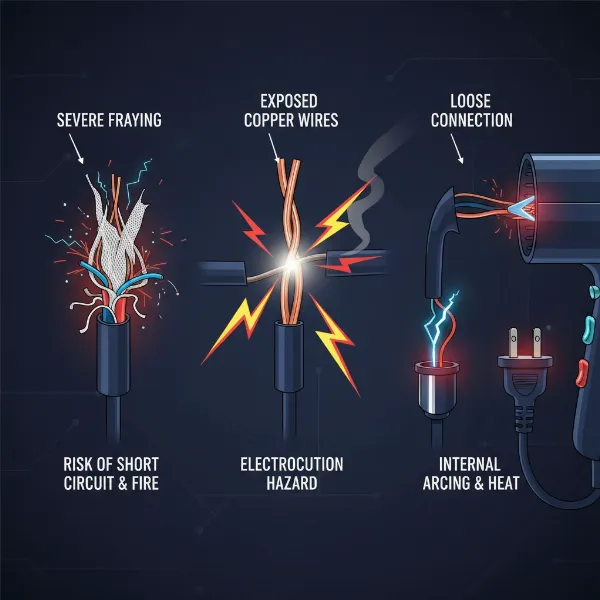 various types of damaged hair dryer cords showing fraying, exposed wires, and loose connections
When to Repair vs. When to Replace Your Hair Dryer
Deciding whether to repair or replace your hair dryer depends heavily on the extent and nature of the damage, as well as the age of the appliance. For minor damage, such as a small section of fraying on the outer insulation with no exposed wires, temporary fixes might be acceptable. These quick solutions can extend the life of your hair dryer for a short period, but they are never a permanent substitute for professional repair or replacement.
However, if the damage is severe—meaning exposed copper wires, multiple breaks along the cord, or issues extending into the appliance’s housing—replacement is strongly advised. Attempting to repair such significant damage can be extremely dangerous and might not resolve underlying electrical issues. Furthermore, consider the age of your appliance. Older hair dryers, even with minor cord damage, might have internal components nearing the end of their lifespan, making replacement a safer and more economical long-term solution.
Essential Tools and Materials for Safe Cord Repair
Before attempting any repair, always ensure the hair dryer is unplugged from the power source to prevent electric shock. For minor cord repairs, you’ll need a few basic tools and materials:
- Electrical Tape: A high-quality, UL-listed electrical tape is essential for insulating minor fraying.
- Heat-Shrink Tubing: Offers a more durable and aesthetically pleasing repair than electrical tape. You’ll need a size that fits snugly over your cord.
- Wire Cutters/Strippers: Useful for precisely trimming damaged sections or preparing wires for more advanced repairs (though often not needed for simple taping/tubing fixes).
- Soldering Iron (for advanced repairs only): If you’re dealing with internal wire breaks within the plug or appliance, a soldering iron and solder might be needed. This is generally best left to professionals.
- Screwdriver Set: Necessary for opening the plug housing to tighten loose connections.
Step-by-Step Guide: Addressing Minor Fraying
Preparation: Unplugging and Inspection
The very first and most critical step is to unplug your hair dryer from the wall outlet. Never attempt any inspection or repair on a live appliance. Once unplugged, carefully inspect the entire length of the cord, paying close attention to the areas near the plug and where the cord enters the hair dryer body. Identify the exact location and extent of the fraying.
Method 1: Using Electrical Tape for Minor Fraying
For small, superficial fraying where no inner wires are exposed, electrical tape can offer a temporary solution.
- Clean the Area: Ensure the frayed section of the cord is clean and dry.
- Wrap Instructions: Starting an inch or two before the damaged area, begin tightly wrapping the electrical tape around the cord. Overlap each turn by about half the width of the tape. Continue wrapping about an inch or two past the damaged section, creating a secure, insulated layer.
- Emphasize Temporary Nature: Remember, electrical tape is a temporary fix. It can degrade over time and doesn’t offer the same robust protection as the original insulation. Regular checks are necessary, and consider replacing the cord or appliance if the damage persists or worsens.
Method 2: Applying Heat-Shrink Tubing for a More Durable Fix
Heat-shrink tubing provides a more durable and professional-looking repair for minor fraying, again, only when no inner wires are exposed.
- Preparation: Ensure the hair dryer is unplugged. Measure and cut a piece of heat-shrink tubing that is long enough to cover the frayed area plus an inch or two on either side.
- Application Steps: Slide the tubing over the frayed section of the cord. If the fraying is near the hair dryer body or plug, you might need to detach the cord from the appliance (which requires some disassembly and caution) or find a tube that can fit over the plug itself if the damage is close to it.
- Heating: Using a heat gun or even a hair dryer (if another one is available and safe to use, or if the damaged one can still be briefly and safely powered on for this specific task, with extreme caution), apply heat evenly to the tubing. The tubing will shrink tightly around the cord, creating a protective, insulated seal. Allow it to cool completely before use.
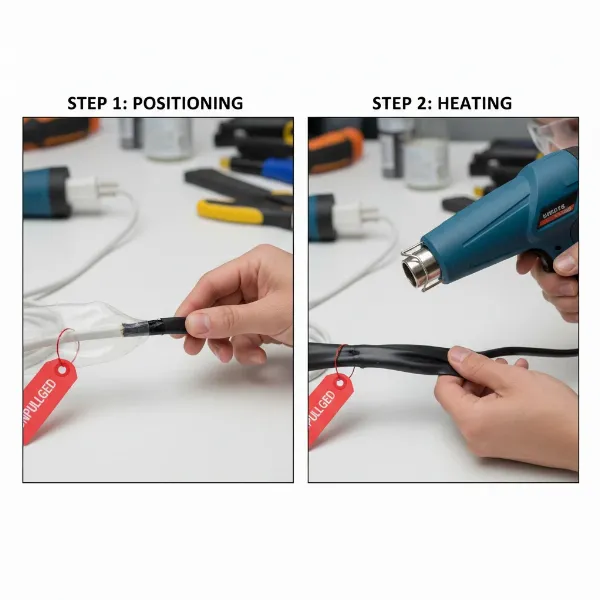 person applying heat shrink tubing to a frayed hair dryer cord for repair
Securing Loose Connections at the Plug (If Applicable)
If you notice your hair dryer intermittently losing power, and the cord itself appears intact, the issue might be a loose connection inside the plug. Many plugs are designed to be opened with a screwdriver.
- Screwdriver and Safety: Ensure the hair dryer is unplugged. Use an appropriate screwdriver to carefully open the plug casing.
- Tightening Connections: Inside, you’ll see the wires connected to terminals. Gently check if any screws holding these wires are loose. If they are, carefully tighten them. Be extremely cautious not to overtighten or strip the screws.
- Reassemble: Once all connections are secure, carefully reassemble the plug casing, ensuring all parts fit correctly.
When to Call a Professional or Consider Replacement
There are certain situations where DIY repair is not advisable and could be dangerous. If your hair dryer exhibits extensive damage (e.g., deeply exposed copper wires, multiple breaks, or damage close to the appliance’s motor), persistent short circuits that trip your circuit breaker, or any signs of internal issues like smoke, unusual noises, or a burning smell, it’s time to call a professional or consider replacement. An electrician or an authorized appliance repair technician can safely diagnose and repair complex electrical issues. If the cost of repair is comparable to a new appliance, or if the hair dryer is old, replacement is often the safest and most sensible option.
Preventative Measures to Extend Your Cord’s Life
Prevention is key to avoiding cord damage and ensuring the longevity of your hair dryer.
- Proper Storage: Always store your hair dryer neatly. Avoid haphazardly tossing it into a drawer where the cord can get pinched or tangled.
- Avoiding Tight Wrapping: Never wrap the cord tightly around the hair dryer itself. This puts stress on the cord’s entry point into the appliance, leading to internal wire breaks over time. Instead, loosely coil the cord.
- Maintaining Slack: When using your hair dryer, ensure there’s enough slack in the cord. Avoid pulling or tugging on the cord to reach further or unplug the device. Always unplug by gripping the plug head, not the cord.
- Regular Inspections: Periodically inspect your hair dryer cord for any signs of wear or damage. Early detection can prevent serious problems.
Conclusion
A healthy hair dryer cord is fundamental to safe styling. By understanding the risks of damage, knowing when to opt for repair or replacement, performing minor fixes correctly, and diligently practicing preventative measures, you can significantly reduce the risk of electric shock and fire. Prioritizing safety will ensure your hair dryer remains a helpful tool rather than a hidden danger.
FAQ
Q: Can I use electrical tape for a permanent fix on a frayed hair dryer cord?
A: No, electrical tape is considered a temporary solution for very minor fraying. It’s not designed for long-term insulation against serious electrical hazards and can degrade over time. It’s best to use heat-shrink tubing for a more durable fix or consider replacement for significant damage.
Q: What should I do if my hair dryer cord is hot to the touch?
A: Immediately unplug the hair dryer and discontinue use. A hot cord indicates an electrical issue, possibly an overload, short circuit, or damaged insulation, and poses a serious fire risk. Do not use the appliance again until it has been inspected by a professional.
Q: Is it safe to repair a cord with exposed copper wires?
A: No, if copper wires are exposed, the cord is severely compromised and poses a significant risk of electric shock and fire. It is not safe to attempt a DIY repair in this situation. You should replace the Hair Dryer or have the cord professionally replaced.