Have you ever found yourself gazing at that little button on your hair dryer, usually blue or marked “cool,” wondering what magic it holds? It’s not just a fancy extra; it’s a secret weapon in your styling arsenal, capable of transforming your everyday blowout into a salon-worthy masterpiece that lasts. Far too often, we rush through our hair drying routine, overlooking the crucial final step that can make all the difference between a style that falls flat and one that holds its shape, boasts incredible shine, and stays frizz-free all day long. This guide will unlock the full potential of your hair dryer’s cool shot button, empowering you to achieve stunning, long-lasting styles while protecting the health of your hair.
Understanding the Cool Shot: More Than Just Cold Air
The cool shot button delivers a burst of cold air, a seemingly simple function with profound implications for your hair. Think of it as the setting spray for your hair, but from the inside out. When you apply heat to your hair, the hydrogen bonds within the hair shaft become flexible, allowing you to shape and mold your style. This is why hot air is so effective for styling. However, if hair is allowed to cool naturally, these bonds can revert, causing your style to lose its shape or fall flat.
The science behind the cool shot is fascinating and effective for professional styling. Hot air opens the hair’s cuticle, making it pliable. When you switch to the cool shot, the rapid blast of cold air instantly closes these cuticles and “freezes” those hydrogen bonds in their new, desired shape. This quick temperature change solidifies your style, ensuring a longer-lasting hold. Beyond just setting your look, this sealing action is crucial for overall hair health and appearance, contributing to a smoother, frizz-free finish.
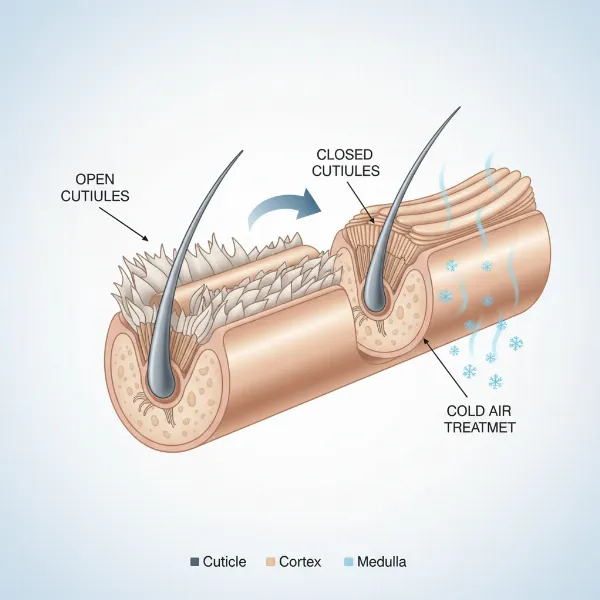 Microscopic view of hair cuticle closing from cold air, demonstrating frizz reduction and shine.
Key Benefits of the Cool Shot Button for Your Hair
Incorporating the cool shot into your routine offers a cascade of benefits, elevating your styling game and improving your hair’s health. Understanding these advantages can motivate you to make this simple step a non-negotiable part of your styling process.
Locking in Your Style
|
Our Picks for the Best Hair Dryer in 2026
As an Amazon Associate I earn from qualifying purchases.
|
||
| Num | Product | Action |
|---|---|---|
| 1 | Conair Double Ceramic Hair Dryer, 1875W Blow Dryer with Diffuser and Concentrator, Ionic Conditioning, 3 Heat & 2 Speed Settings, Amazon Exclusive, White |

|
| 2 | Infiniti PRO CONAIR Hair Dryer with Diffuser, Professional AC Motor, Tourmaline Ceramic Technology Blow Dryer, Includes Concentrator and Blowout Brush, Amazon Exclusive, Gray |
|
| 3 | Wicked Elphaba Hair Dryer with Diffuser from Conair - INFINITIPRO by CONAIR Hair Dryer with Ceramic Technology - Includes Diffuser and Concentrator |
|
| 4 | Wicked Glinda Hair Dryer with Diffuser from Conair - INFINITIPRO by CONAIR Hair Dryer with Ceramic Technology - Includes Diffuser and Concentrator |
|
| 5 | INFINITI PRO by CONAIR Hair Dryer, 1875W Blow Dryer with Diffuser and Concentrator Attachments, AC Motor with Ceramic Technology, 3 Heat & 2 Speed Settings, Plum |
|
| 6 | INFINITI PRO by CONAIR Hair Dryer, 1875W Blow Dryer with Diffuser and Concentrator, Ceramic Technology, 3 Heat & 2 Speed Settings, Cold Shot Button, Black |
|
| 7 | Conair Double Ceramic Hair Dryer - Blow Dryer with Ionic Conditioning - Includes Concentrator |
|
| 8 | Wavytalk Hair Dryer, Blown Away Ionic Hair Dryer for Curly Hair with Diffuser, 1875W Fast Drying Blow Dryer with Ceramic Technology, 3 Attachments for All Hair Types, Light and Quiet, Rose Gold |
|
| 9 | Wavytalk Hair Dryer with Diffuser, Blown Away Ionic Hair Dryer for Curly Hair with Comb, 1875W Fast Drying Blow Dryer with Ceramic Technology, 3 Attachments for All Hair Types, Light and Quiet, Black |
|
| 10 | Infiniti PRO CONAIR Hair Dryer with Diffuser and Concentrator, 1875W Style & Shine Blow Dryer with Tourmaline and Ionic Conditioning to Fight Frizz, 3 Heat & 2 Speed Settings, Blue |
|
The primary function of the cool shot is to set your hairstyle, ensuring it endures throughout the day, impervious to humidity and movement. Whether you’re aiming for bouncy curls, sleek straight strands, or voluminous waves, the cool blast “locks” the style in place. This mechanism prevents your hair from reverting to its natural state prematurely, giving you confidence that your hard work will last. For special occasions or simply a busy day, this extended hold is invaluable.
Boosting Shine & Smoothness
One of the most visually appealing benefits of the cool shot is the undeniable boost in shine and smoothness it imparts. Hot air, while necessary for styling, can lift the hair cuticles, leading to a duller appearance. The cool shot efficiently closes these cuticles, creating a smooth, reflective surface that catches the light beautifully. This results in visibly glossier hair that looks healthier and more polished. It’s like adding a natural topcoat to your strands.
Minimizing Frizz
Frizz is a common hair woe, often exacerbated by open cuticles and moisture imbalances. By sealing the hair cuticles, the cool shot creates a protective barrier, preventing external humidity from penetrating the hair shaft and causing frizz. This smooth, closed cuticle layer helps hair lie flat, reducing flyaways and promoting a sleek finish. For anyone battling frizz, the cool shot is an essential tool in achieving a smooth, controlled hair texture.
Protecting Hair Health
While heat is a styling necessity, excessive and prolonged exposure can lead to dryness, breakage, and overall damage. The cool shot provides a natural counterpoint to hot air, helping to cool down your hair swiftly after heat styling. This rapid cooling minimizes the duration your hair is exposed to high temperatures, reducing the risk of heat damage. It’s a simple yet effective way to maintain the integrity and health of your hair, especially for those with color-treated or fragile strands.
Adding Volume
For those desiring extra lift and body, the cool shot can be particularly effective. When creating volume, especially at the roots, heat helps to mold the hair upwards. A blast of cool air immediately after this lifting action sets the hair in its elevated position, preventing it from collapsing. This technique is fantastic for achieving lasting fullness and bounce, making your hair appear thicker and more dynamic.
Step-by-Step Guide: How to Effectively Use the Cool Shot
Mastering the cool shot button is straightforward, but timing and technique are crucial. Integrating this simple step can dramatically improve your styling results. Here’s how to do it effectively:
Preparation: Shape with Warm Air
Begin your styling routine by drying your hair with warm or hot air until it’s about 90% dry. Use your brush or hands to create the desired shape and volume. The goal of this phase is to remove moisture and mold your hair into the style you want to achieve before locking it in. Ensure your hair is mostly dry; using the cool shot on soaking wet hair is ineffective for setting and can actually prolong drying time.
Sectioning for Precision
For best results, work on your hair in manageable sections. This allows you to apply the cool shot precisely where it’s needed, ensuring every part of your style is properly set. Use clips to secure sections you aren’t currently working on. This method provides better control and allows the cool air to reach specific areas more effectively.
The “Shot”: Setting Each Section
After you’ve used heat to style a section (e.g., wrapped hair around a round brush, straightened a piece, or defined a curl), immediately switch to the cool shot button. Direct the cool air over that specific, still-warm section for about 5-10 seconds. The sudden temperature change will solidify the hydrogen bonds in their new shape.
- For Straight Styles: As you pull a section of hair taut with a paddle or round brush, use the hot air to smooth it, then immediately apply the cool shot along the same section, from roots to ends, maintaining tension.
- For Curls or Waves: Once a curl is formed (either with a diffuser or by wrapping around a round brush), hold it in place and blast it with cool air. This “freezes” the curl, enhancing its definition and longevity.
- For Volume: Lift the hair at the roots with a brush, use hot air to create lift, then apply the cool shot directly at the base of the hair. This sets the volume you’ve created.
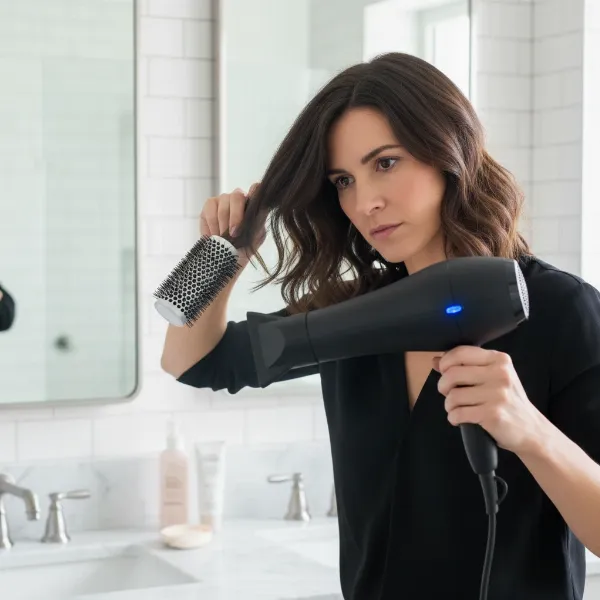 A woman using a hairdryer's cool shot button to set a section of her hair with a round brush.
Finishing Touch: An All-Over Cool Blast
Once you’ve worked through all sections and set your style, give your entire head a final, quick cool blast. This helps to further seal the cuticles and ensure a cohesive, long-lasting finish across all your hair. Step back slightly and allow the cool air to flow over your entire head for a few seconds.
“The cool shot button is a non-negotiable final step for professional stylists. It’s not just about cooling the hair; it’s about locking in the molecular structure we’ve created with heat, ensuring the style holds all day long.” – Michael Douglas, Celebrity Hairstylist
Common Cool Shot Mistakes to Avoid
While the cool shot is simple to use, a few common errors can prevent you from reaping its full benefits. Avoiding these pitfalls will elevate your styling game significantly.
Using Cool Air on Wet Hair
One of the most frequent mistakes is using the cool shot too early in the drying process, when hair is still soaking wet. The cool shot is designed for setting a style, not for initial drying. Using it on wet hair will simply prolong drying time and can even contribute to frizz, as it’s not efficient enough to smooth the cuticle without prior heat. Always aim for hair that is at least 90% dry before engaging the cool shot.
Skipping Sectioning
Blasting cool air randomly over your entire head after drying might feel like you’re doing something right, but it’s largely ineffective. Without proper sectioning, the cool air can’t precisely target and set the individual styled sections, leading to an uneven and less durable hold. Take the extra minute to section your hair; it pays off in the longevity of your style.
Not Combining with Heat Properly
The cool shot works in tandem with heat. Its purpose is to “set” the shape created by hot air. If you skip the hot air phase or don’t properly shape your hair with heat beforehand, the cool shot has nothing to lock into place. Think of the hot air as the sculptor and the cool air as the fixative; both are essential for a lasting creation.
Holding the Dryer Too Close
Even with cool air, holding your dryer too close to your hair can create discomfort or disturb the already-formed style, leading to flyaways. For optimal results, maintain a distance of about 6 inches from your hair while using the cool shot. This allows for an even distribution of cool air and helps maintain a calm, frizz-free finish.
Maintaining Your Hair Dryer for Optimal Cool Shot Performance
A well-maintained hair dryer is essential for consistent performance, including the effectiveness of its cool shot feature. Regular cleaning ensures optimal airflow, which is critical for both hot and cold air delivery. Make it a habit to clean the air filter regularly, typically after every few uses. Dust and lint can accumulate, restricting airflow and making your dryer work harder, potentially compromising the cool shot’s cooling power. Simply remove the filter cover and gently brush away any debris. Storing your hair dryer properly, such as hanging it by its loop or keeping it in a dedicated drawer, can also prolong its lifespan and ensure its components, including the cool shot mechanism, function correctly.
Choosing a Hair Dryer with an Effective Cool Shot Feature
When investing in a new hair dryer, the cool shot button should be a key consideration. While most modern dryers feature one, their effectiveness can vary. Look for models with a clearly defined cool shot button that delivers an immediate burst of genuinely cold air, rather than just less-hot air. Some professional hair dryers offer a continuous cold air setting, which can be even more convenient than holding down a button.
Consider the dryer’s overall power and airflow; a powerful motor will deliver a stronger, more effective cool blast. Features like ionic, ceramic, or tourmaline technology complement the cool shot by providing additional benefits such as faster drying, reduced static, and enhanced hair health. An ergonomic design and appropriate weight also contribute to a comfortable styling experience, making it easier to maneuver the dryer for precise cool shot application.
Conclusion
The cool shot button on your Hair Dryer is an often-underestimated tool that holds the key to achieving professional-quality, long-lasting hairstyles. By understanding the science behind this simple feature and implementing the correct techniques, you can transform your daily styling routine. From locking in intricate curls and sleek straight looks to boosting shine, reducing frizz, and protecting your hair from heat damage, the cool shot is truly a versatile secret weapon. Don’t let your style fall flat; embrace the power of the cool shot button to elevate your hair game and enjoy beautifully set, healthy-looking hair every day. What’s your favorite cool shot styling trick that you can’t live without?
Frequently Asked Questions
How long should I use the cool shot button on each section of hair?
Aim for 5-10 seconds of cool air on each styled section. This duration is usually sufficient for the hair to cool down and for the hydrogen bonds to reset, effectively locking the style in place. Overdoing it isn’t harmful, but it’s often unnecessary for optimal results.
Can I use the cool shot button on all hair types?
Absolutely! The cool shot button is beneficial for all hair types. Whether you have fine, thick, straight, curly, or color-treated hair, the cool air helps to set your style, enhance shine, and reduce frizz. It’s particularly useful for hair prone to damage or frizz.
Does the cool shot button really prevent heat damage?
While it doesn’t prevent heat damage during the hot air phase, using the cool shot button helps to minimize the overall impact of heat. By rapidly cooling the hair and sealing the cuticle after heat exposure, it reduces the time your hair remains at a high temperature, thereby contributing to better hair health and integrity over time.
Is there a difference between a “cold air setting” and a “cool shot button”?
Yes, there can be. A “cool shot button” typically delivers a burst of cold air only while pressed. A “cold air setting” (or “cold air switch”) often provides a continuous flow of cool air without needing to be held down. Both achieve the same goal of setting the style, but the continuous setting offers more convenience for prolonged use.
Can I use cool air at the beginning of my drying routine?
It’s generally not recommended to use cool air at the very beginning of your drying routine when your hair is still very wet. The cool shot is designed to set a style that has already been shaped with heat, not to dry hair. Using it too early will significantly increase drying time and may not provide the desired styling benefits.